Module 3: Abstract Data
Note: Although this software and accompanying documentation is dated 2004-2005, it is still valid in 2014. Questions can be sent to CDC-INFO.
This module applies a template protocol to abstract the three different data types: standards, unknowns, and quality control samples, from 96-well ELISA plates stored in plate data files with a .DAT extension. Before executing this option, Module 2 may be used to pick a template, with the ‘Select’ command button. Refer to the Template Design section for further details.
The present module begins by displaying a data file selection dialog window used to choose a plate data file for processing. All files with a .DAT extension will appear in the file list box.
If a template was not selected prior to entering this module, the user will be presented with a template file selection dialog window where a template file may then be chosen.
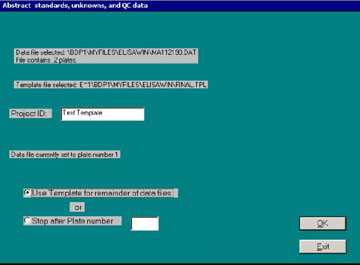
Once the plate and template data files have been selected, a dialog window appears as is shown in Figure 9. The dialog window displays the name of the plate data file as well as listing the number of plates contained in that file. Also listed is the current template chosen for plate data abstraction. Additionally, the dialog window informs the user of the plate number where processing will begin.

Figure 9. Dialog window for Module 3 – Abstract Data.
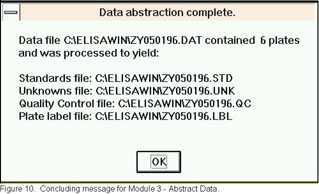
As mentioned in the data file structure section in the Introduction, several plates may be stacked or concatenated in one .DAT file. However, it is not necessary for all of these plates to be analyzed with the same template protocol. Conceivably, the placement of standards, unknowns, and quality control samples may be the same from plate to plate, but the dilution series may differ for some of the plates. Conversely, the different plates within one plate data file may have entirely different configurations. A new template is required each time the dilutions or the plate configuration change. The dialog window in Figure 9 permits the user to abstract the data from each .DAT file using one or more template protocols. If the default option, ‘Use template for remainder of file’, is selected, each of the three file types will be extracted using the selected template starting with the plate number listed in the dialog window. If the ‘Stop after plate number’ option is selected, the user will need to enter that plate number in the text box to the right of the option label. If this second option is chosen, the current template protocol will be used to extract the data starting with the plate number the file is currently set to (listed in the dialog window) through plate n where n is the number entered in the text box previously described. Note that the user must first select the ‘Stop after plate number’ option before actually entering the plate number itself. That is, the program will restrict plate number entry in the text box until the appropriate option has been selected. ELISA for Windows abstracts the data and then returns to the template file selection dialog window where a new template is chosen. The dialog window in Figure 9 reappears and includes the updated plate pointer: ‘Data file currently set to plate number n+1′. The user now may choose to apply the new template to the remainder of the file or to stop after another plate number, m, where m > n.To begin, assume the first option is selected where one template will be used for all plates. Once the plate data file has been specified, ELISA for Windows abstracts the three data types, standards, unknowns, and quality control samples. The abstracted data will scroll up the computer screen. The first column of the screen listing is the dilution in decimal form (e.g., 600 entered in the template module is converted to 0.001666667), the second column is the optical density, and the third column is STD, UNK, or QC for each of the three data types. These three data types will be written to three separate files named using the root file name of the plate data file selected above and the appropriate extension. Thus the standards are written to file.STD, the unknowns to file.UNK, and the quality control samples to file.QC, where file is the root file name of the plate data file previously selected. Any comment lines in the .DAT file will be abstracted and written to file.LBL. These four files will be written to the same subdirectory as the plate data file. An informational message detailing this will appear as shown in Figure 10.
Clicking on OK will return the user to the main menu (Figure 3).

Figure 10. Concluding message for Module 3 – Abstract Data.
The user selects the second option in the dialog window (Figure 9) to apply more than one template to a group of plates in a .DAT file. As an example, consider a plate data file with six plates. It is desired that three separate templates be used to process plates 1-3, 4, and 5-6, respectively. The dialog window (Figure 9) initially reports that the file is set to plate 1; select the second option and type 3 in the text box to indicate the current template will process plates 1 through 3. When these plates are processed, the template file selection dialog window will reappear and a new template may be chosen. The dialog window (Figure 9) will then appear stating that the plate data file is now set to plate 4. Select the second option again and type 4 in the text box. After plate 4 is processed, another template is selected and the dialog window reappears. Now the window indicates the plate data file is set to plate 5. choose the first option to process the rest of the plate data file (plates 5 and 6), or select the second option and type 6 in the text window to indicate processing should stop after plate 6. The module will conclude either way with the informational message shown in Figure 10.If the template employed for abstracting the plate data does not contain one or more of these three data types or if there are no comment lines in the .DAT file, the associated files will still be created. They will, however, be empty. Also, if this module is exited using one of the earlier prompts, these files will also be created and, in this case, each of them will be incomplete. If an empty file is created, do not delete it because, in some cases, its presence may be required by succeeding modules in the data analysis modules of ELISA for Windows.
Top of Page
- Page last reviewed: September 4, 2013
- Page last updated: September 21, 2005
- Content source:


 ShareCompartir